It’s time to chit your potatoes!
Our head gardener Emma O’Neill gives her top tips for giving your seed potatoes a head start this spring.
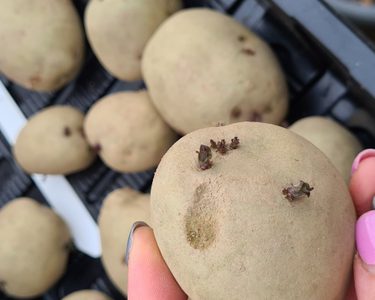
Chits are the buds or eyes on the rose end of your potato
Chitting potatoes ahead of planting shortens the time from planting to harvest. It also helps with disease resistance because less time in the ground means less time for diseases and problems to take hold.
Here’s my top tips:
- Buy good-quality seed potatoes. The Organic Gardening Catalogue offer some organic varieties. It’s best to buy from a catalogue rather than from a supermarket because these potatoes will not be certified and could introduce potato diseases into your soil.
- Inspect the potatoes to ensure there is no mould or rotting. Wrinkles are fine!
- Place them in a single layer in an egg box, or seed tray, with the eyes (buds/chits) upwards and heel end down (this is the narrow end that has been cut from the vine).
- Place in a cool, light place, preferably on a north facing windowsill. They won’t want to be above a radiator as this can make them shrivel up. Too light: and the chits will become long and will be more likely to break off. Equally, a dark corner will make the seed potatoes produce white shoots.
- When your potatoes have 2cm knobbly, purple-green shoots – in around four to six weeks – they are ready for planting.
- If you want large potatoes for baking, rub off all but three or four of the largest shoots when they are 1-2cm long.