Chris Collins on…harvesting hacks
Here it is again: the happy time! The part of the gardening year when all your efforts in the garden, allotment or balcony are hitting their peak - and the harvesting season has truly begun. There’s nothing like the late summer months to really see the fruits of our labour (pun completely intended).
This year has been a particularly hard graft due to the dry weather. I’ve been down to the allotment at 6am most mornings making sure my crops are getting the start they need. It's a big commitment, but I’m happy to report its now raining! Beans, tomatoes, squash, pumpkin, courgette, cucumber and salad crops are coming and it’s truly rewarding.
My harvesting tips
There’s a lot of advice out there on how to grow edibles - however there’s not so much on how to harvest. How do you know when the crop is ready, how do you pick it, and how do you store it when you have way more than you need?
I personally like to pick my crop early in the morning, when the plants are at their most hydrated. It’s best to do this on dry days as this will help avoid spreading any water born mildews or moulds.
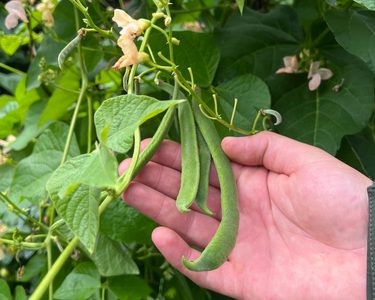
And it’s important to keep practising the gentle approach. Pulling produce roughly off plants can often result in damage, and beans are a good example. I use a small pair of snipper or secateurs to remove them from the raceme (stalk of flower clusters). Remember also that regular harvesting will encourage the bean to flower and fruit throughout the season.
Cucumbers and courgettes give us lots to enjoy at this time of year - so much so, it’s almost hard to keep up! My technique is to gently grip the base of the pedicel (the small piece of stalk attaching the fruit to the stem) and slowly twist to the left to give a clean break. But if this feels a bit rough then a sharp gardening knife will also do the job. The same goes for pumpkins and squash, but these can also be picked green and ripened later.
Other crops that are starting to produce this month are tomato, pepper, aubergine and chilli. Check the colour, and use your fingers to feel if the fruit is both plump but firm. These fruits will be ready when they are easily pulled away from the parent plant.
When it comes to salad leaves and spinach, I like to pick the leaves from the outer edges of the plant to encourage further production. It’s also worth remembering that the seed sowing season it’s not quite over yet so salad crops, radish and beetroot can still be squeezed into the last section of summer.
If you sowed beets, carrots and turnips earlier, they should now be sitting close to the surface waiting to be pulled. Onions and potatoes signal they are ready for harvesting through their foliage. This becomes tired and brown as the energy transfers to the bulb or tuber, making it ripe for picking. One tip for potato harvesting is to use a small border fork to loosen the soil around the plant. Gradually work down through the soil to flush up the potato. This might not be everybody’s technique, but I find I damage less of the crop this way!
Ideas for storing your crops
Now what to do with this incredibly generous bounty? Of course, there’s the great tried-and-tested method of sauces, preserves and pickling - but many crops will keep well if stored in the right conditions. Root crops can be layered with sand and kept in a cool dark place like a garage. An old water butt can be used for layering root crops with sand and then dug out as required. Brassica crops such as cabbage can be left in situ until ready for use, and kale and broccoli can be grazed as needed.
It’s worth mentioning that it’s also time to let some plants go to seed for collection. There’s many wonderful heritage varieties of tomatoes, which blow F1s out the water when it comes to taste. Always leaves some of your plants to complete their life cycle as this will encourage predators like parasitic wasps that will help control pest number next year.
It’s a truly wonderful time of year so enjoy all your hard work, both on the plot and in the kitchen!
Chris Collins
If you’re a member, you can read an article in our Organic Way magazine about how to use and store a glut. If you’re not a member, find lots more advice on our Expert Advice pages, or consider supporting our charity at gardenorganic.org.uk/join.