Wildlife gardening
How to make a pond
A pond can provide shelter, drink, and food for wildlife. Here we show you how to build a pond, choose pond plants and look after your water feature, as well as learn about its benefits.
How to build a pond
Our head of organic horticulture Chris Collins shares advice on building a pond in your garden.
Step one: where should I build my pond?
- Choose a site with plenty of sunshine. This helps the plants to grow and keeps the water warm.
- Avoid making a pond under trees. Their roots can disturb or pierce the liner, and autumn leaves can choke and clog the water.
- Ponds should be safe. Young children can drown in 8cm of water.
- It would help with maintenance if access is easy. You need space to pull out excess weeds and tend to your planting.
Step two: When is the best time to make a pond?
Autumn or early spring is probably the best time of year for pond installation. Avoid frost during construction (it makes the earth hard to dig), and delay any planting in your new autumn pond until Spring.
What type of pond?
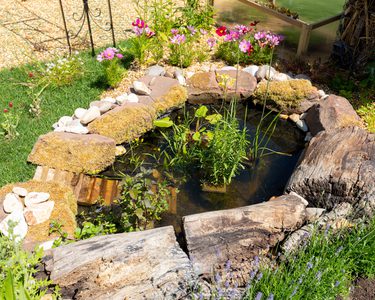
Ponds can be any shape or size. You can buy a pre-formed shape, or dig and line your own design.
Getting started
- First, mark out your site. If you are using a preformed pond, place it on site and mark its perimeter with a line of sand.
- If you are designing your own pond shape, don't make the outline too ornate - it is hard to fit the waterproof liner into tight curves and angles.
- A pond should be up to 60cm deep at one point. This allows wildlife to be safe during prolonged spells of hot or cold weather. However, it is the shallow water that most wildlife enjoys, such as tadpoles, damsel flies, and baby frogs. And you might want ledges for planting under the water. Ideally, your pond has different depths.
Now dig the hole…
Have a sheet of plastic or board nearby to put your soil and turfs on.
Keep the topsoil and the more stony subsoil separate. The latter is useful for building up levels under the liner, and the former is for planting around the pond edge.
For a preformed pond
- dig approx 5 cms wider and deeper than the pond shape
- back fill with 5 cms of sand and check levels with a spirit level on a piece of timber resting across the top.
- now rest the pond shape on the sand, making sure it is firmly supported at all points
- as you fill the pond make sure the edge stays level with the ground, backfilling with sand and subsoil if necessary
- either create a border with discarded topsoil, or use replaced turf
For a lined pond
- first, dig your whole pond area to approx 20-25 cms deep.
- Now you need to create shallow and deep areas. The shallow bits are near the perimeter, to allow wildlife to get in and out easily. First, dig a deep central hole, creating a shelf at the edges – not a slope. This shelf will become the shallows.
- in general, dig a further 10 - 15 cms deeper than you estimated - this allows for a bottom layer of sand or rubber underlay to protect the liner.
- remove all sharp stones and other hard objects from the hole to protect the liner.
- firm around the base and sides of the dug area. The soil must not cave in when you are placing the liner in position.
- make sure the pond edges are level with each other in all directions. If necessary build up a side to achieve this. Check with a spirit level on a piece of timber.
- before you lay the liner, put down a layer of sand, then carpet or cardboard, or thick layers of newspaper. Or buy purpose-made underlay.
How to line the pond
- To get the right size lining material, use the following measurements: for a pond measuring 150 cm long and 100cm wide, with maximum depth of 60 cm, get a piece 150 + (60 x 2) long x 100 + (60 x 2) wide ie 270 x 220 cm. (Length of pond + (maximum depth x 2); width of pond + (maximum depth x 2).
- lay it over the hole. Make sure there is about 30-40cms overlap around the edges. Dip it half-way to two-thirds into the hole, but don't try to shape it close to the sides.
- weigh down the sides of the liner around the pond edge with heavy stones.
- fill the pond with water. You can use tap water, or fresh rainwater from a butt.
- as the weight of the water increases, keep pulling and smoothing the lining so that it stretches and fits snugly against the sides. If you have to build up any areas, make sure the soil is compacted down hard.
- now you can make the sloping sides. Place the subsoil on the shelves round the side, building it up to the edge. But leave some areas as a shelf, which is useful for putting plants onto.
At this stage, the pond will look an unpromising muddy mess. But this will soon clear. After 3-4 days the water will reach air temperature, and some of the tapwater chemicals will have evaporated.
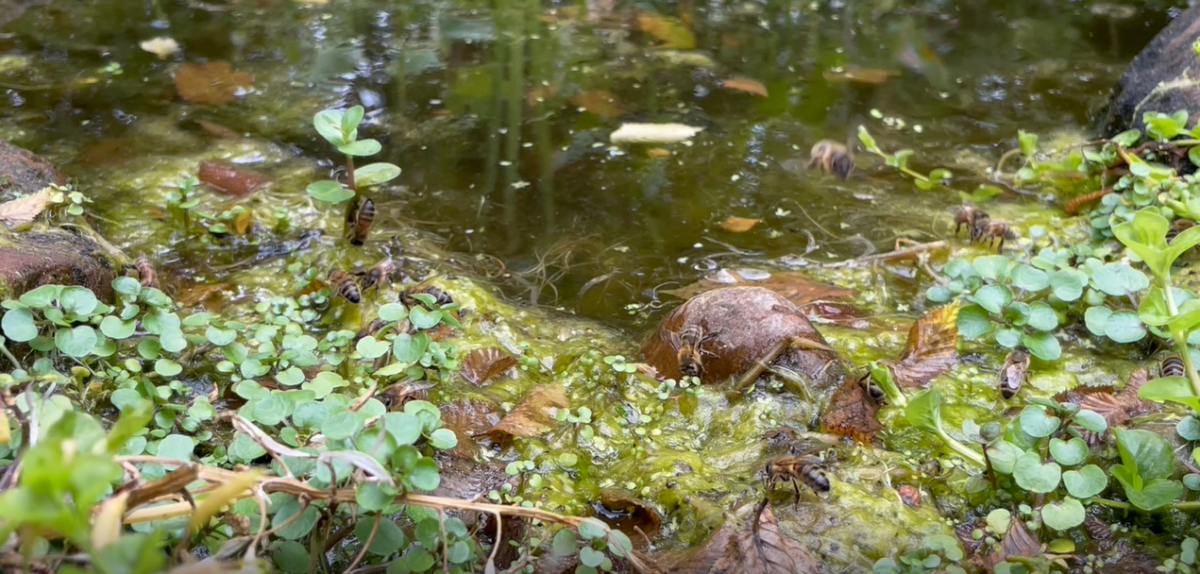
In Spring, when the frosts are over, aquatic wildlife will find their way to your pond. Frogs, toads, newts, and all sorts of insects and water bodies will miraculously appear.
As the water warms in the sun, algae will appear. Don't worry, and don't replace the water. As the water creatures start to feed, and as the plants start to grow, the algae will be starved out.
Choosing plants for your pond
Aim to have about 1/3 of the pond surface covered with a variety of plants. See the list below for deep water plants, those which provide oxygen in the water, floating plants, and marginals. And if you have a boggy area next to the pond then choose plants that enjoy moisture at their roots, such as Primula, Lysimachia, Astilbe.
Deep water plants
Water lilies (Nymphaea alba, Nymphaea lutea) (Note - it is very important to check you have the correct size of lily for your pond)
Water hawthorn (Aponogeton distachyus) - will tolerate anything from 8-60 cm of water.
Broad leaved pondweed (Potamogeton natans)
Amphibious bistort (Polygonum amphibium)
Oxygenators
These submerged plants provide food and shelter for pond life. In addition, they absorb minerals and carbon dioxide which helps starve algae and keeps the pond water clean:
Water milfoil (Myriophyllum spicatum)
Water buttercup (Ranunculus aquatilis)
Hornwort (Ceratophyllum demersum)
Water violet (Hottonia palustris)
Floating plants
Water soldier (Stratiotes aloides)
Bladderwort (Utricularia Spp)
Frogbit (Hydrocharis morsus-ranae)
Duckweed (Lemna spp) often comes with purchased plants. This tiny leaved plant can cover the surface in no time at all. The only way to get rid of it is daily removal until all traces have vanished.
Marginal plants
These plants grow in the shallows at the pool edge. Some (not listed) can become very invasive, so choose with care.
Flowering rush (Butomus umbellatus)
Marsh marigold (Caltha palustris)
Golden sedge (Carex stricta' Bowles Golden')
Pendulous sedge (Carex pendula)
Yellow iris (Iris pseudocorus)
Lobelia (Lobelia fulgens and L. cardinalis)
Water mint (Mentha spicata)
Water plantain (Alisma plantago-aquatica)
Bog bean (Menyanthes trifoliata)
Arrowhead (Sagittaria saggitifolia)
Lesser reed mace (Typha minima) – beware of Bulrush, T. latifolia, it is too large and invasive for garden ponds
Alien species
The following is a list of alien invasive species. These have been introduced into ponds as ornamentals. They are a threat to native plants when they escape and rapidly colonise waterways and ponds. Unfortunately, some garden centres and aquatic specialists are still selling these plants.
New Zealand pygmyweed - Crassula helmsii
Parrot’s feather - Myriophyllum aquaticum or M. proserpinacoides
Fairy moss or Water fern - Azolla caroliniana
Floating pennywort - Hydrocotyle ranunculoides
Benefits of a ponfd
- It will rapidly increase the wildlife in your growing area. Birds, amphibians, and insects will come.
- You can choose a variety of attractive plants, from marsh marigold to water mint, to enhance your growing area.
- But perhaps most importantly, you have a wonderful place to sit, observe, and enjoy the waterside activity.
How to look after your pond
Once established, a pond is fairly self-managing. However, in the autumn, leaves should be removed as they can decompose and cause toxic conditions. A net spread over the surface will prevent them from entering the water.
As plants grow, they will need to be split and kept to a reasonable size for the pond. Work like this, causing a major disturbance, is best done in late summer, after frogs, toads and other creatures have hatched, and before hibernation starts. Any major pond overhaul can take place at this time.
If long spells of hot weather cause a lot of evaporation, you need to top up the pond before it dries out completely. Water straight from the tap contains chlorine. Fill a can or two with water and allow it to stand for 24 hours to allow the chemicals to evaporate, then add to the pond. A good system is to add the water to the pond in the evening, refill the containers immediately and allow them to stand for 24 hours until the next evening.
Weeds can choke a small pond. To keep duckweed or blanket weed under control, remove excessive growth ruthlessly. When you pull them out, keep piles of weeds by the side of the pond for a day. This allows pond creatures to crawl, or fall, back into the water.
The Freshwater Habitats Trust has advice on making freshwater ponds as well as information about aquatic wildlife.
Watch our Youtube video of quick tips when creating a pond.
Join Garden Organic!
By becoming a Garden Organic member you can join thousands of people who are already leading the movement for an organic and sustainable future for us all. And get great member benefits!
Join today